
Creating the product:
- Navigate to Product management > Products
- Click ‘Add product’ in the top-right corner
- Choose ‘Product’ and ‘Class’
- Add your class name
- Add to an existing class product group (folder) if you have one
- Click ‘Add new product’
Product settings
Outlined below are the settings required for a functional class that members can book in the shop, but you may wish to consider other settings such as age restrictions and forms – for more details check out our broader guide: Adding new products: setting up Classes.
Details
If you would like your classes to be bookable in your shop, ensure the Status is Public.
Pricing
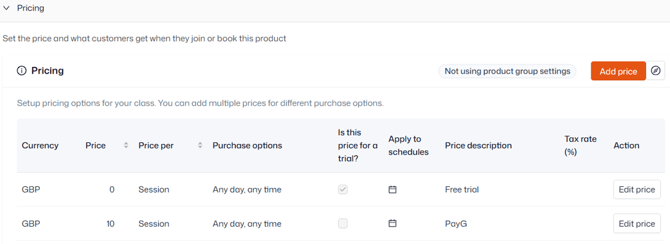
- Click ‘Add price’
- Enter the cost for one session and choose:
- ‘Price per’ – Session
- ‘Purchase option’ – Any day, any time
- Click ‘Save’
If you would like to offer a free trial, add another price in the same way, and make sure ‘Is this price for a trial?’ is ticked. You may also like to add a description.
Billing
- ‘General’
- 'Billing frequency' - Single payment (one-off)
- 'Approve purchase before payment' - No is recommended, but you can choose Yes if you would like an admin to have to approve all bookings
- 'Collect payments automatically' - Yes
- 'Pro-rata payments' - Not applicable
- ‘Instalments’ – No
- ‘Payment providers’ – select the payment provider used for payments
- ‘Billing suspension’ – none
Trial (if applicable)
- ‘Maximum number of trial places for this product’ – how many free trialists can attend any one session
- ‘How many days in advance a trial can be booked’ – the option to book a trial will only show in the shop this many days before any given session
- ‘Limit how many trial places each person can book’ – 1
- ‘Number of sessions included in the trial’ – 1
Shop
If you already have a shop tile for your classes, simply check the ‘Include’ box next to it. If not:
- Click ‘Manage shop tiles’ then ‘Add shop tile’
- Ensure it is active and has a name (e.g. Pay-as-you-go-classes)
- Do not hide the label unless an image is uploaded
- Choose the ‘Week calendar’ or ‘Session’ view
- Optionally change the tile colours and upload an image
- Click the Save icon then ‘Okay’
- Check the ‘Include’ box next to the tile to assign the class to it

Creating the schedule:
- Click the ‘Schedules’ tab at the top of the screen
- Click ‘Add schedule’
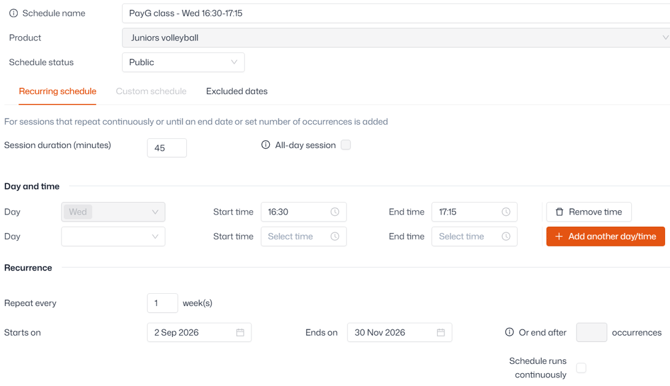
- Select ‘Recurring schedule’ then add your session duration, days, and times
- We recommend adding each day of the week as its own schedule
- Give the schedule a start and end date (or have it run continuously)
Important: No session will take place on the schedule’s end date, so we recommend putting it the day after the last session.
- Ensure an address is added to ensure attendees know where they’re going
- Add a maximum capacity and how far in advance the sessions should be bookable
- 'Let customers choose when they start' - not applicable
- Click ‘Save’ and you’re done!
Final checks
Once you’ve finished creating your class product and schedule(s), including any other settings not detailed in this guide, we recommend checking the customer journey by making a booking yourself. No need to confirm the purchase, just add some sessions to your basket and proceed through the checkout to make sure everything’s working as expected and all the information is correct.